Before installing the Plate , you should have ready-made padding material of suitable size. The padding material should be a stone or polyester material rather than a paper product, because the paper is easy to absorb moisture and easy to shrink. The width of the padding material should be the same as or slightly narrower (eg, 1/16 to 1/8 inch or 2/3 mm). If it is too wide, it can easily absorb the fluid on the dampening roller. The padding material can be cut to the size of the old printing plate.
Plate inspection and processing
When handling the plate, hold the gripper and the trailing edge of the plate to prevent damage to the protective layer on the blank part of the plate. Place it on a clean, dry, flat surface and check against the standard plate. Inspections include scratches or other undesirable defects.
According to the manufacturer's instruction manual, minor corrections may be made to the printing plate by etching and gluing, or minor changes may be made to the graphic part using a knife scraping and then applying an ink or a plate making ink. However, when making major changes, it is necessary to remake the plate. The determination of the padding material To determine the thickness of the padding material, the thickness of the printing plate must be measured first. A desktop micrometer mounted on a workbench is more suitable in a press shop because it can measure both elastic and rigid objects. If the printing shop does not have such a micrometer, then it is better to use a micrometer for paper, which is better than the mechanical micrometer. Because the former has a large overlay, the numerical value is more accurate if the elastic object is measured.
Place the plate on a flat surface and measure at least three thicknesses and calculate the average value. If you are using a paper micrometer or a mechanical micrometer, you should try your best to flatten the plate to ensure the measurement. The thickness of the padding can be calculated according to the thickness of the printing plate as follows: The printing plate or the printing machine specification gives the size of the roller reducer (that is, the difference between the radius of the roller and the roller, also called sinker depth) and Difference in height (the difference in height between the plate on the plate cylinder and the highest point of the roller after the plate liner). Some machine manufacturers think that the plate should be flush with the sleeper, but the usual practice is that the plate is slightly higher than the roll. The sum of the depth of the sinker groove and the height difference between the rollers is equal to the sum of the plate thickness and the pad thickness. The depth of the sinker groove plus the difference in the height of the pillows minus the plate thickness results in the thickness of the backing.
That is: pad thickness = sinker depth + height difference - plate thickness.
Plate cylinder preparation
Most sheetfed printers can move both circumferentially and laterally, and their plate holders can be adjusted in one or more directions. Therefore, before installing the plate, the rollers and clamps should return to the "zero" position, and the rollers must be kept clean.
According to the instructions, it is necessary to circumferentially position the printing plate. First loosen the circumferential fixing screw of the plate cylinder and return it to the zero position. (Take care that all screws are tight after adjusting).
Reposition the end clamp of the plate to the zero position, ie move the clamp to the lowest point (toward the cylinder); then move to the center of the two rollers and tighten the tightening screw by hand. If the printer's fixture is a decentralized device, that is, it consists of several sets of sub-clamps, each sub-clamp should be zeroed as described. Reset the main fixture to the instruction manual to determine the setting start point. Then position it in the middle of the drum and tighten the screws.
Wash the ink, rubber grease, and pad material particles on the surface of the drum with a suitable solvent to remove any rust. Apply a little oil to prevent rust and easy installation of the pad.
Plate installation
Each printer manual has detailed plate installation instructions. The following is a list of the typical installation steps:
1. Cut off the ink supply system of the ink roller and dampening roller before installation to prevent contamination of the plate. The printer was set to "onimpression" and screwed for two weeks to ensure that the pressure was normal.
2. Place the trailing edge of the plate in the main fixture. If there is a locating pin, align the plate edge hole with the locating pin; if not, align the center line of the plate with the center line of the fixture. Tighten the middle fastening screw.
3. Insert the pad material with a certain thickness into the back of the plate. Be careful not to bend the edge or beyond the edge of the plate. Align the marking on the plate with the marking line on the printing cylinder by adjusting the fastening screws on the primary fixture.
4. Grasp the plate and padding material by hand and manually twist the press fixture forward one by one until the plate is inserted into the tail clamp. The pressure between the printing plate and the blanket cylinder is in an "ON" state, so that the plate moves forward along the platen. This is done so that the plate can be brought into close contact with the plate cylinder.
5. After the plate is inserted into the tail clamp, clamp the clamp. However, before fastening the fixture, manually adjust the forward rotation of the printer until the plate tail just reaches the position where the plate cylinder and the blanket cylinder contact. This is done so that the plate can be placed in the fixture and the lateral displacement of the plate tail clamp can be minimized. Tighten the fastening screws in order from the center to the sides. If the press is equipped with quick-type fixtures with eccentrics, they can be clamped directly to the plate. Refer to the press operating instructions for proper adjustment.
6. Fix the plate as much as possible at right angles with intermediate fastening screws. Tighten the setscrews, not the tightest, but also make it a degree when pulling the edges of the roller grooves.
7. Knock the side of the cylinder with your knuckles. If the plate is not tightly integrated with the drum, it will sound empty. If it does sound empty, tighten the tail clamp screw while tapping until the plate, backing, and drum are tight. Then set the press to the "off pressure" state, and then manually forward for two weeks.
If any surface bulges on the plate, the installation is not straight enough. In this case, try to loosen the tightening screw of the tail clamp and push the tail of the plate toward the center of the printing press, and then tighten the tail clamp fastening screw. If this is not enough, you must re-install and reinstall.
Regardless of the reason, when the plate needs to be removed, the tail clamp fastening screw or quick eccentric clamp should be loosened, and then the plate is removed from the clamp. While manually grasping the plate and padding material to prevent scratches, manually reverse the printing press. Remove the fixture screw or quick eccentric fixture to remove the plate and pad material.
Reproduced from: Wins
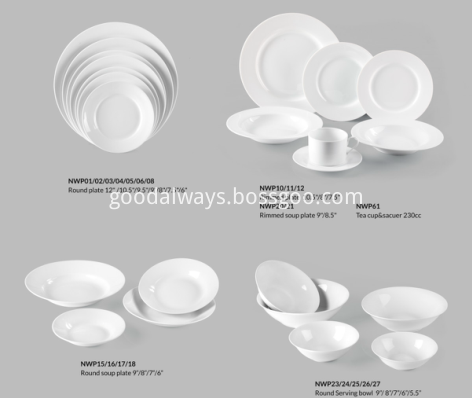
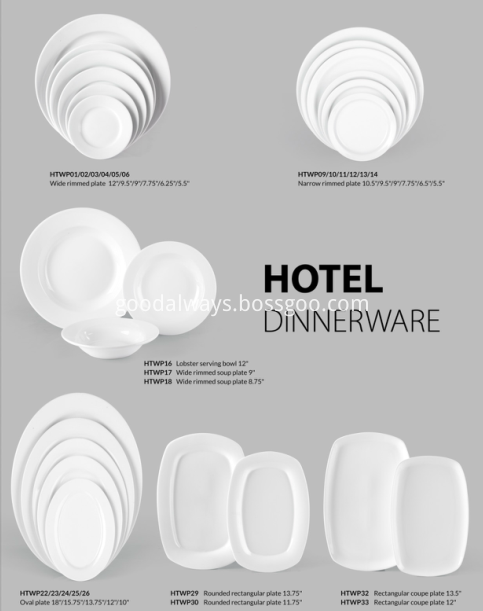
Porcelain Dinner Plate, Side Plate, Dessert Plate, Salad Plate, Appetizer Plate, Restaurant Plate , Cake Plate, Serving Dish ,Kitchen Dish , Soup And Sandwich Plate , White Plate , Plates Set , Dish Sets
Dishwasher and microwave safe, durable and easy to care for, With CIQ,
SGS, CIQ and LFGB certificate
Welcome OEM and accept your own band and design.
Round, coupe, square ,irregular shape , We can make different combination of Dinnerware Sets as your requirement.Such as oval dish,serving plate.
Coffee set / Tea Set can be in different packing: bulk packing, gift color box, Mail Box, PDQ, Pallet packing, IKEA packing.
Payment terms: T/T or L/C
Delivery date: 45 days
Accept OEM and your own brand and design
Samples are available.
MOQ: 1000 pieces for bulk item, gift sets is 600 sets
Mixed order is accepted.
Any more question, please contact our customer service.


Dinner Plate, Side Plate, Dessert Plate,Porcelain Plate
Shenzhen Good-Always Imp.& Exp.Co.Ltd , http://www.good-always.com